Monday, December 5, 2011

A month of Christmas Tags?

I made Christmas tags to sell at the Holiday House at my church this past weekend.  Thank goodness I took pictures because I sold all of them!  I am going to share a few with you.  Some are original ideas, others copied.  Tags are fun to make and give as hostess gifts!  

Gable Green discontinued card stock with some decorative paper I had.  Ric rac makes everything happy!
 Enjoy!

Wednesday, November 9, 2011

Give Thanks

Have you noticed the beautiful trees as you drive around town.  Our favorite tree has been 'turned on' again.  It looks like someone flipped the switch and it is glowing! 
This card uses the beautiful Gently Falling set and Hand Penned from the mini catalog. I took the Spice Cake designer series paper and punched circles to go behind the Lace Border punch.  I like the way it makes the punch pop off the card!

Keep looking for Christmas cards and tags I have been working on.
Dawn

Monday, October 31, 2011

I did it!

My goal for the weekend was to get started on the cards I will sell in the upcoming Bazaar my church is having.  I got one whole package of cards made!  I was inspired by a card made by Laura Lin using this set and colors.  I changed this one up a little.  The card base is Wisteria Wonder.  I ran the Very Vanilla through he Big Shot with the Lattice embossing folder.  The image is stamped with StazOn black then I gave the flower the softest touch of color with Wisteria Wonder and Mellow Moss ink.  I like the simple elegance of this card.
Thanks for looking,
Dawn

Friday, October 14, 2011

Fall is in the Air

Just to tickle your "Fall-y" bone, I put together this card using the Spice Cake designer series paper featured in the Holiday Mini.  You get 12 sheets of double sided paper for $10.95 and they all coordinate beautifully.  I used the Button Buddy set to stamp the pumpkin, then added a button on top.  I really liked the patch of burlap, and just used a strand of the burlap to tie the bow in the button.   Simple but pretty.  I think the best part of this card is that it uses Pool Party for the base- I love that color.  I may have to come up with a great Christmas card using Pool Party and red....
Thanks for looking.
Dawn

Tuesday, October 4, 2011

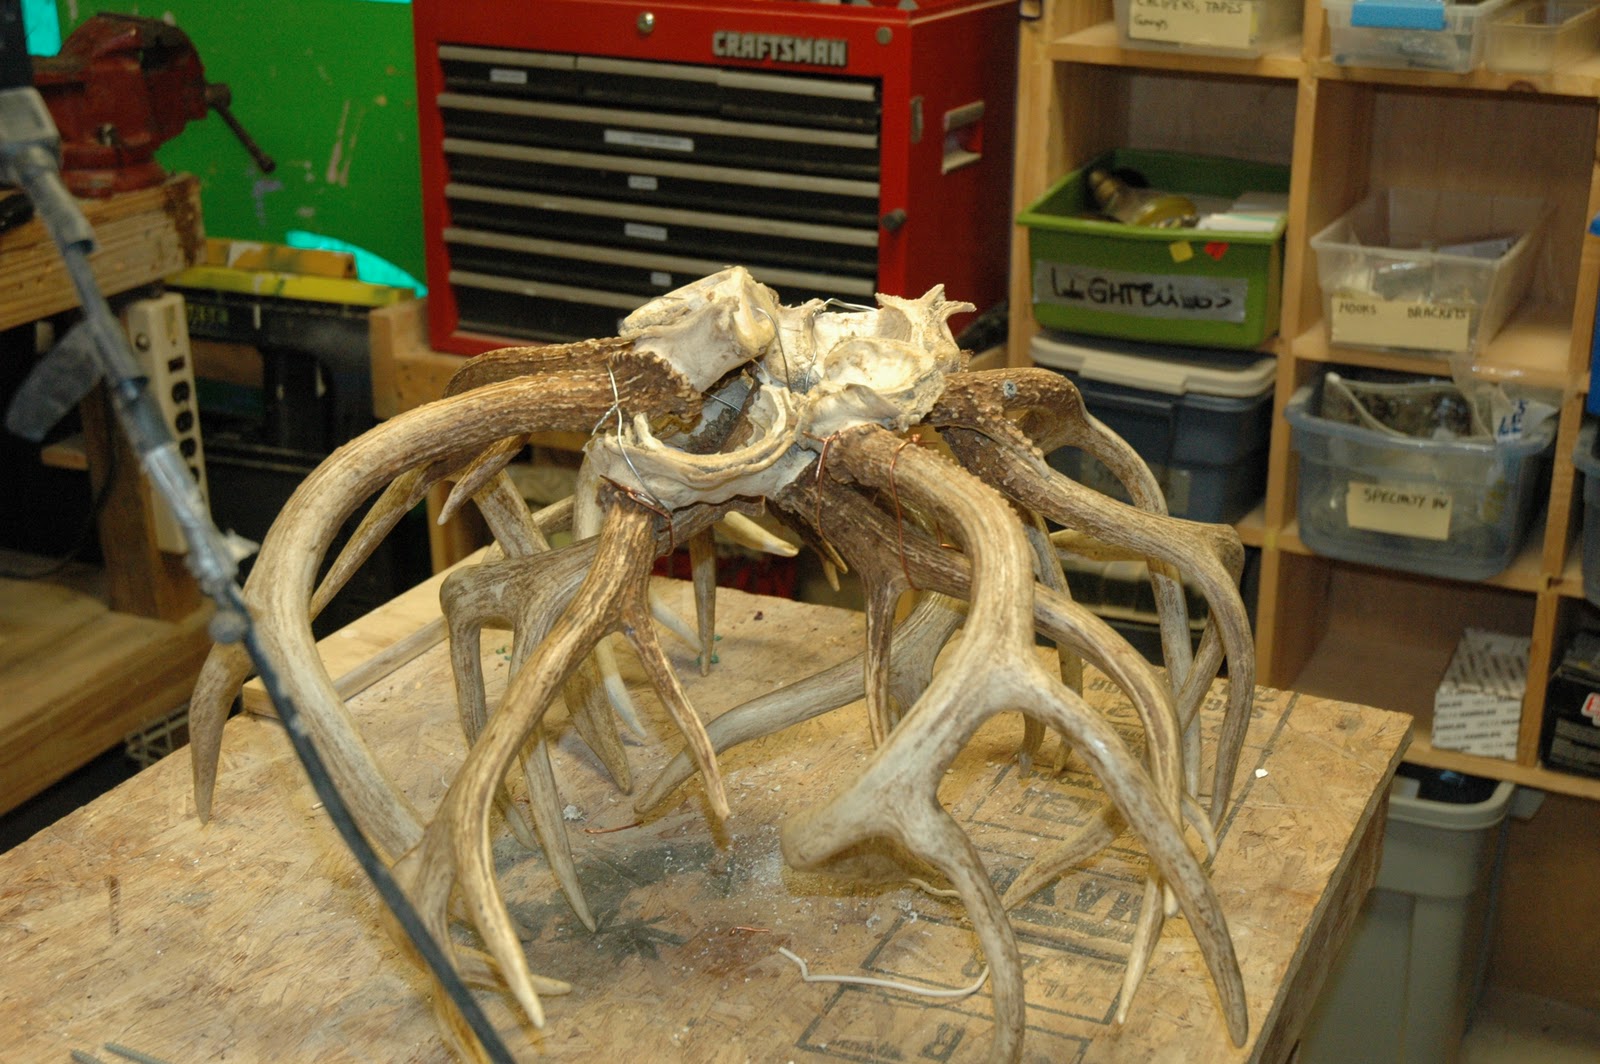
Deer Antler Coffee Table

I hate to admit it, but I am a dumpster diver and have raised a kid who dives too, so when Blair brought home a huge pile of deer antlers from the side of the road, my mind started whirling.  I have been looking for a coffee table to go in our family room.  So when my favorite handyman came to visit- we got to work making my idea come to life. 
First we put all the antlers in a bunch trying to make them look good from all sides. 
 Then we wired and screwed them together. 
 My favorite handyman- my Dad- used the saw to trim the "brains" as even as possible.
 The hardest part was shimming it up so the board we wanted to use would lie flat. 
 Finally, we were pleased with the results!  We screwed everything together...
                                           and tried it out in the family room.  This was just an old top that I had from another table.  I purchased a piece of birch wood from Lowes, sanded it down...
                                                                added iron- on veneer (this is my other favorite handyman)...
 and stained it all. 
Now it is at home in the family room.  I love the rustic look with the rest of my furnishings. 
                                                                   
Thanks for looking.
Dawn

Monday, October 3, 2011

Halloween Fun


I was playing around in the craft room with my favorite Halloween stamp set of all time- Wicked Cool, and came up with this fun and easy card.  I stamped the bats in the upper portion of the card by using a full inked stamp then stamping again without reinking.  The Witch is orange tulle layered and bunched up with the Stampin'Up! black waffle paper over it.  I pinched it all at the top then tied the ribbon around it.  I clipped and tucked as needed, then stuck it all down with glue dots.  The boots were stamped under the cape, and the hat on Pumpkin Pie card stock.  For the final touch, I squirt Dazzling Details on the hat before I cut it out. 
You can get the waffle paper on clearance right now if you shop on my SU web page! 

Wednesday, September 28, 2011

Sour Cream treat holders

 At the last workshop we made these great treat holders that look like sour cream containers.  They are super easy to make, and fun to decorate for whatever event you got going on. 
What you need to know are the basics- then you can have fun.  The containers that are pictured here start with a piece of 5 1/4' x 4 1/4" card stock (you can use decorative paper too).  In both cases the paper was run through the Big Shot in an embossing folder.  Then you tape up the short side so the paper makes a tube.  Use good tape so they don't pop open.   Pick one end to tape closed.  If you want to add ribbon or some decorative
paper, stick it in the opening before you tape it closed.  Now pay close attention.  Fill your container with a treat, then pinch the open end closed so that it is perpendicular to the first closing.  It should look like a sour cream holder.  Use your good sticky tape to close this end. You can decorate the outside with fabric, ribbon, or tags.  The container to the left was copied from Stampin'Up!.  I used the new Spice Cake Designer Fabric to make a ribbon, added a Pool Party tag, and tied a Big button on with the Linen Thread.  All Supplies can be ordered on my SU web site. 
The Halloween container is a little different in that I punched a hole in the paper before rolling it into a tube, then taped a window sheet over the hole.  The rest is all the same, I just changed the decorations.  It was so cute filled with Fall color M&Ms and candy corns, but I ate them before I took the picture!
Let me know if you have questions or comments.
Dawn

Tuesday, September 20, 2011

Another Halloween Card

 I love making Halloween cards, and have spent way too much time in the craft room trying to make this one work!  Finally, I am ready to share it's greatness with you!  (We will be making this one in the workshop this week!)  This card features the new Bigz L Die from Stampin'Up! called Peekaboo Frames, and the Simply Scored, both of which are in the Holiday Mini catalog. 
What a surprise when you lift the frame opening to find a spooky message! 
I squirt a little Dazzling Details on the witch's stockings just for fun. 
The other secret on this card is the way I altered the top note so it more closely mirrors the frame.  I just cut it in half and fastened the ribbon over the middle. 


Another fun card using the Wicked Cool stamp set.


Monday, September 19, 2011

Spooky

I love this card.  It is simple and pretty, and only uses the word from a Halloween set.  In other words, you don't have to forget about your other stamp sets to make Halloween cards.  Change the colors and the greeting and you have a great card for any occasion. 
We are making this one at the workshop this week.  Let me know if you want to come.
Dawn

Sunday, September 18, 2011

Simply Scored love!

Meet the new love in my life- Stampin'Up!'s Simply Scored.  It is so much fun to use, and so much easier than the one I already have.  Truthfully, this one doesn't even belong to me.  It is my friend Diane's and she let me try it out before I release it to her.  The groves are just the right size, the stylus has two ends so you can make large or small scores, and the markers keep you from having to mark up your ruler so you can remember where to score.  I highly recommend this to you crafters. 

 So I must show you the card we will make in the workshop this week that I made using the Simply Scored.  I was inspired by a card made by Jill Coleman at jillstamps.com.  She gave instructions on how to do the accordion fold which I changed up a little to fit my card idea. 
You need a piece of card stock 5 1/2 by 11".  Place paper on the scoring tool long ways and score at 1 1/2" and 5 1/2".  Flip the paper like a pancake then score at 3" and 8".  Fold and flatten with your bone folder.  Then you are ready to decorate.  Now those measurements will give you a skinny card, so I added mine to the front of a regular card so the finished card measures 5 1/2" by 4 1/4".
I used the Frightful Sight DSP with Lucky Limeade and Cajun Craze card stock.  The ghost is the Owl Builder punch using only the owls body and cutting off his legs :(  The spiders are punched out of the paper with the 1" punch then glued to the back of the fold where the ghost are. I also used waffle paper on the back of the front fold to give the ghost a little something to peek around.  The only other thing is the words on the paper from several Halloweens ago.  They are perfect hidden in the fold behind the spiders.
There is a long list of supplies, so leave a comment if you are curious about something used here.
Thanks for looking.